
 You might also like
 Makeup
Makeup
Makeup 


Welcome to the GirlGetGlamorous blog!
Subscribe for monthly emails of the latest
blog posts and videos, sent right to your inbox.
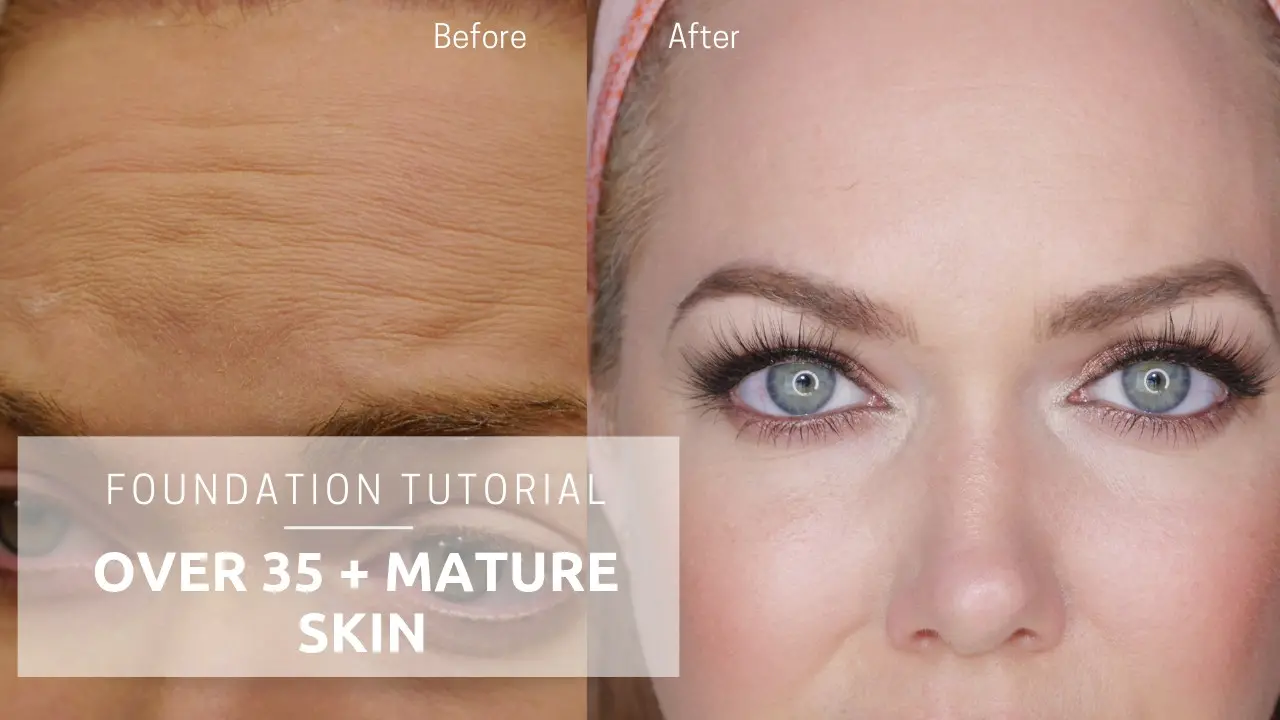
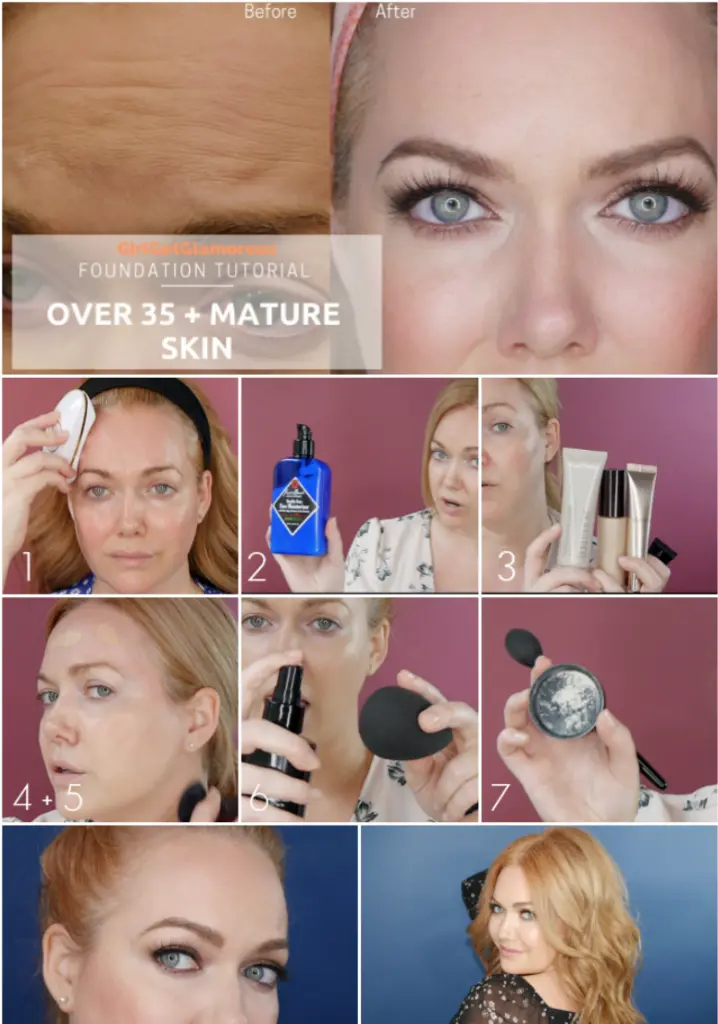
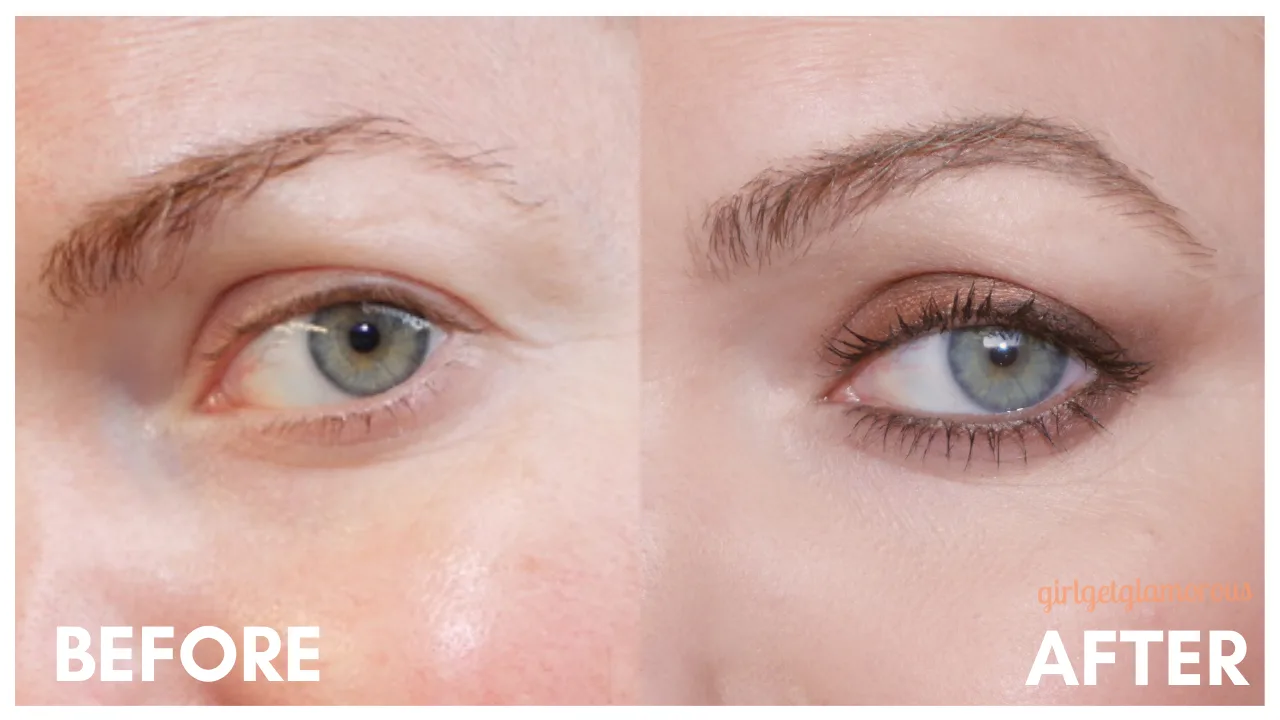
I get tons of requests for a recommendation of my favorite foundations for dry and mature skin. While I’m happy to share all my favorite foundations in this post, beyond the actual product, the technique is so, so important.
This technique gives me the medium coverage I like, without accentuating fine lines around my eyes or on my forehead.
As I said in the concealer video, I don’t mind aging, I actually really love it, but I still want to look my best and for me that means glowing and fresh!
H I T P L A Y
1 | Skin Prep
Just like in my concealer technique post, skin prep is the biggest change I’ve made to my makeup routine in my 30’s.
I love using a jade roller when I’m in a rush and the ZIIP device when I am working from home or have an event.
Both help with bloating, they push out any excess water your face is retaining, which brings the contours back to your cheeks and give skin major glow.
shop | face roller . ZIIP Beauty Device

2 | Hydrate
After washing my face, I apply my Japanese toner/serum combo with my hands (no cotton rounds) and then eye cream and moisturizer.
Skincare helps the makeup glide on and prevents dry patches that makeup can stick to and create unwanted texture.
shop | Toner/Serum . Eye Cream . Face Lotion with SPF
3 | Primer
I used to really go either way on primer, like ehh if I’m moisturized enough then maybe I don’t need it?
But as I’ve gotten older, I’ve noticed that certain primers really can help with smoothing out forehead lines and visible pores around my chin.
The key is to look for a primer that is thin and spreads easily. A thinner primer gives me the smoothing I want, without the super blurred or facetuned look.
shop | Beauty Blender Pro . Becca BackLight Priming (for face) . Armani Fluid Sheer . DHC Primer . Laura Mercier Primer
4 | Blending Neck and Chest
If you are lucky enough to not have any sun damage, you might be able to skip this step. I however, have a lot sun damage and redness on the skin on my chest.
The best way to blend my face makeup and make it look more natural is to apply a tinted moisturizer to my neck and chest.
This gives a little color and smoothness to my neck, without any heaviness or visible makeup. I set with a setting spray to prevent the tint from transferring to clothing.
shop | Bare Minerals Tinted Moisturizer . Tarte Complexion Brush
5 | Foundation
We are like, finally here, right gang!?
I know it seems like we’ve already done a zillion steps. In real time, the first four steps only take me about a minute to do before it’s time for foundation and they make such a big difference in my foundation results.
With my foundation, I’ll apply one pump all over my face and blend my with hands or a foundation brush.
Then, I spot touch up any places I feel like I need a little more coverage.
Applying this way saves me from doing two layers all over, which can accentuate fine lines on the forehead or around my eyes and mouth.
I also choose foundations with a more satin or dewy finish vs. a matte finish.
shop | Koh Gen Do Moisture Foundation (I’m shade 113) . Armani Luminous Silk Foundation (I’m shade 4.25) . It Cosmetics Foundation Brush . Setting Spray
Related Post | Finding the Right Foundation Shade
6 | Setting
Baking is a technique where you apply a lot of powder all over your face and let it sink in to stop foundation from moving.
It’s honestly a great technique on young, oily skin, but on dry or mature skin it just doesn’t work. It will accentuate any little patch or dry area and make fine lines look deep.
I M P O R T A N T | To set my makeup using minimal amounts of powder, I like to spray two pumps of setting spray directly in the round bottom area of my beauty blender.
I make sure my bb is damp and let it sit out for around 20 minutes before I start my makeup, so that it’s not dry or too wet by the time I do my makeup.
I squish the setting spray into my blender so that it’s not sitting on the top of the sponge, then bounce that gently all over my foundation.
This will help set the makeup for 10-14 hours. It’s one of my top secrets for bridal or e-com (the pics your see while online shopping) makeup, where the models will be changing a 100 times a day. I never share this secret, but heck, here you go.
After this, I’ll use a tiny amount of setting powder, my favorites are Hourglass Veil and Laura Mercier, on a pointed Wayne Goss brush. I apply under my eyes at the inner corner, in the t-zone, around the sides of my nose, and at the corners of my forehead.
It’s important to use the most minimal amount of powder possible. You’ll get the semi-matte finish you want, without a heavy look.
shop | Setting Spray . Wayne Goss Powder Brush . RT Setting Brush (drugstore alternative) . Hourglass Setting Powder
P I N M E
SHOP
READ MORE
SOCIAL LINKS
Thank you for reading and being a part of the blog!


LEAVE A COMMENT
Hi, if I use foundation, no matter how I prime my skin, the foundation settles into the pores all over my face! I never had this problem when I was younger. Any suggestions? I tend to use tinted moisturizer since it’s lighter and settles less.
Hi Molly! Thank you so much for the great tips! I use cream-based blush and highlighter in my routine. Would you recommend doing the bb+spray and powder setting steps before or after using cream-based blush and highlighter?
What setting spray do you recommend for 35+ combination skin? Any favorites?
Hi! Yes, I love the Skindinavia sprays! Here is a new post that just went about about them 🙂 https://girlgetglamorous.com/skindinavia-primer-setting-sprays-review-finishing-oil-control-bridal-best-way-to-make-makeup-foundation-stay-last/ xo – Molly