
 You might also like
 Strawberry Blonde Hair
Strawberry Blonde Hair
Strawberry Blonde Hair 


Welcome to the GirlGetGlamorous blog!
Subscribe for once weekly emails of the latest
blog posts and videos, sent right to your inbox.
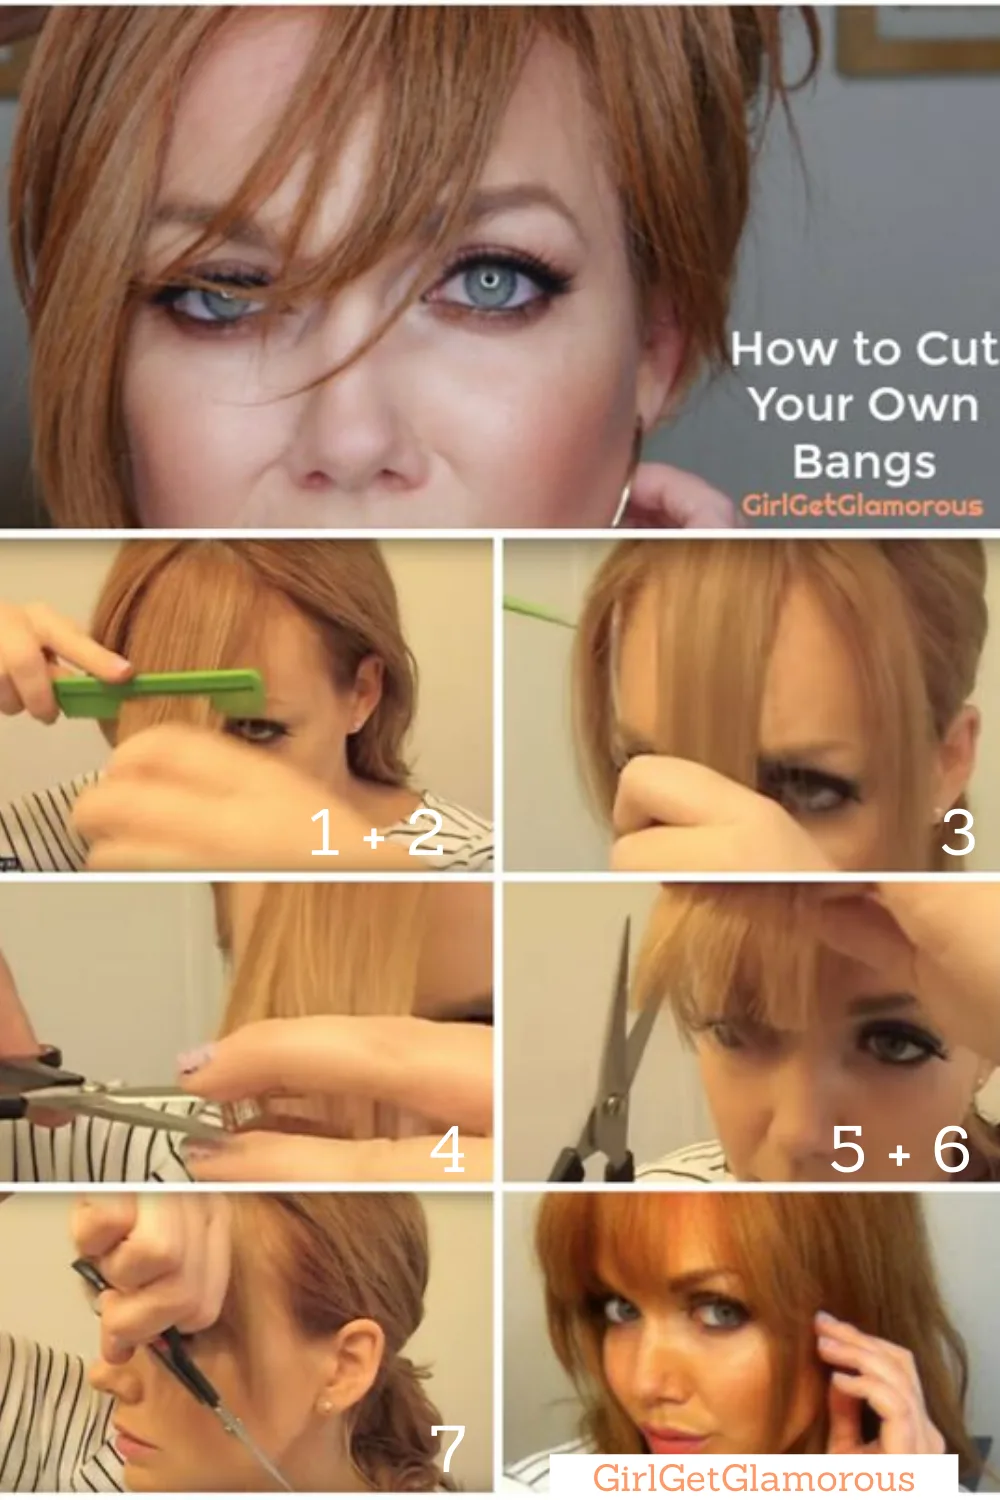
The five scariest words a hairdresser can ever hear are “I cut/trimmed my own bangs!”
But they don’t have to be. For real. My hair stylist said this is the best tutorial he has ever seen for trimming or cutting your own bangs.
The trick to getting wispy bangs is to actually cut up into the ends. But I’m getting a little A HEAD of myself here. Hahaha! …Ok. I’ll stop.
I like to trim my hair while it’s dry because it lets me see the real length of the bangs, which prevents them from ending up too short.

HIT PLAY
Step 1 | Use the thin tail side of the comb to section off clean lines of hair.
Starting about 1 inch or 1.5 inches back off your forehead, divide a triangle of hair.
The peak of the triangle is going to be directly at the center of your head.
Step 2 | On the sides of the triangle, leave out two 1/2 inch pieces on either side and clip them aside for now.
These pieces will be cut longer, to blend your bangs into the rest of your hair. You do not have to do side pieces if you prefer a more blunt bang style.
Step 3 | Taking the hair in the main triangle, section section into thin horizontal layers. This will make it easier to cut your hair and give your better results!
You’ll have two to three layers. Clip the extra layers out of the way.
Step 4 | Cut straight across first. I always cut slightly longer than I think I want my bangs to be.
You can always trim more off later.
Step 5 | Now, turn your scissors vertical and cut up into the bottom 1/2 inch of hair. This is called point cutting.
Move over a a bit and repeat all across the bottom of the bangs.
This technique is what makes the ends wispy and more natural looking.
Step 6 | Take down the next thin horizontal layer. Take a piece from the first layer for length reference. Repeat horizontal, then vertical cutting.
Step 7 | Now on to the side pieces, I like to start them about 2 to 4 inches longer than the bangs and have them taper into my hair.
Meaning, the side pieces will be shorter for the pieces close to your eyes, and longer at the ends, the pieces closer to the rest of your hair.
Hold your scissors facing down towards the floor now and trim starting at the side closest to your eyes. Again, this will be the shorter section and you’ll move your scissors down towards the outside of this section, leaving the outside the longest.
Again, start longer, because you can always go shorter. These pieces will help the edges of your bangs blend into the rest of your hair beautifully.
I went a bit too short in the video! It happens. The good news: hair grows 🙂
Styling Tip | I like to flat iron the ends with a mini flat iron – a must have for styling bangs – and add a tiny amount of shine serum to make the ends smooth but slightly piecey.
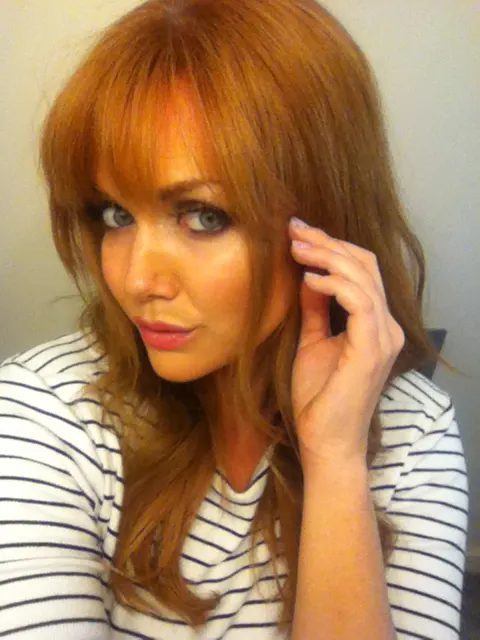
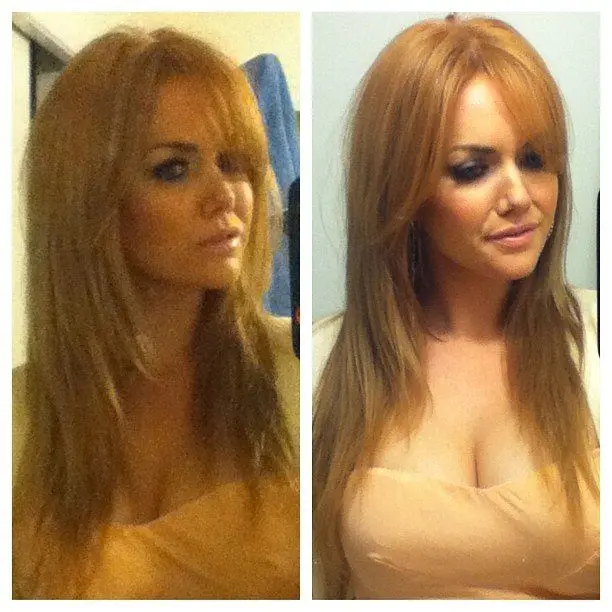
Above were my results when I cut the bangs a little bit longer for side-swept curtain bangs.
READ MORE
SOCIAL LINKS
Thank you for reading and being a part of the blog!


LEAVE A COMMENT
This is one of the best tutorials for cutting or trimming your fringe on the internet, and I’ve checked out a lot of tutorials… It takes the mystery out of cutting the face framing side pieces. The genius is always in the simplicity. Thanks so much for putting this together!
Possibly the best bang tutorial I’ve watched…and that is saying something! Kudos! 😀
Thank you, Sarah, I really appreciate that!! Glad the bangs tutorial is helpful!
xo Molly
I just did it! And it looks as great as a real ($) haircut! Thank you a million times!!! My first attempt at cutting my own hair, ten years ago, was a disaster, but now, I am free! Going on to the hair color recipe now…
I do a blog and I know what kind of work goes into it. Your directions and how much you care about the information you are giving is a beautiful thing to see. I posted your blog on my blog. Your positivity, humor and beauty are a pleasure to see and read. Thank you for all of your very hard work, Molly.
Sincerely,
Women of Uncertain Age
aka Lisa Burkhart. I copied your hair color recipe and finally achieved the strawberry blonde I have trying to go back to ever since I finally colored. (I colored my hair the first time at 43). I loved my natural strawberry blonde hair but I was so uneducated about hair color. I am now so happy with my color. I use the Color Charm 3/4 8g and 1/4 titian. 🙂
Thank you, Lisa! You are so unbelievably sweet and thoughtful, I always appreciate your comments!!