
 You might also like
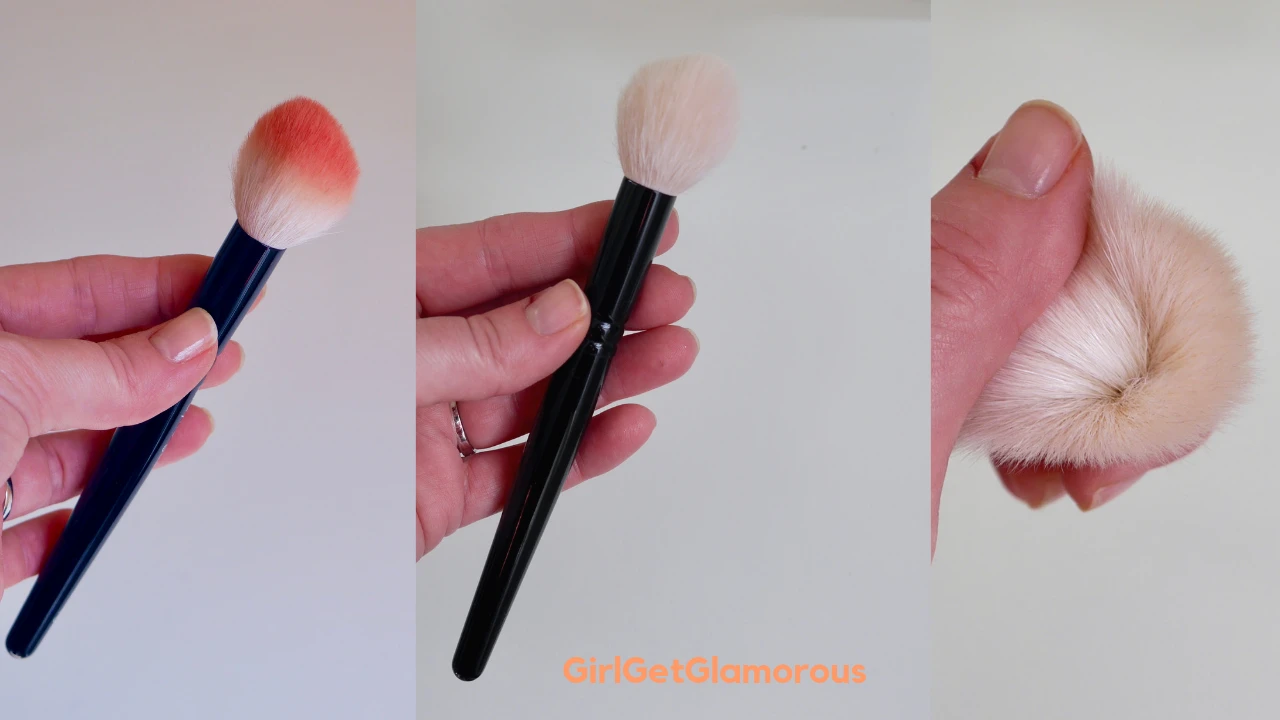 Tutorials
Tutorials
Tutorials 


Welcome to the GirlGetGlamorous blog!
Subscribe for monthly emails of the latest
blog posts and videos, sent right to your inbox.

It’s so interesting to me to see which makeup brushes I tend to gravitate towards, out of the hundreds and hundreds I have tried, and what makes this brushes stand out. I thought it would be helpful to do a post and video showing each of my favorite brushes for face, eyes, and eyebrows and showing how I use each.
I have favorite brushes at every price point, so there is really something for everyone: beginner-friendly brushes, people looking to invest in brushes they’ll own forever, and some amazing deals. I am constantly testing new brushes and updating this post if any stand out and replace my favorites!
1 | What To Look For In a Makeup Brush
Brushes are made with three parts: a handle, bristles, and the metal section that holds them together, called the ferrule.
The handle and bristles need to be well attached to the ferrule to reduce shedding and get years of use out of a brush. Foundation brushes especially need to be made well as they get a lot of rotation on the bristles as you blend.
TIP | I prefer to use brushes with longer handles, as it’s best to grip brushes closest to the very end (farthest from the bristles), for the softest product application.
2 | Bristles
Makeup brush bristles can be made of synthetic fibers or natural hairs.
Synthetic fibers are man-made in a lab and natural hair brushes are from animals.
Natural hair bristles can either be cruelty-free, meaning collected and sanitized from brushing animals living on a farm (the animals are not harmed) or they can come as a by-product of the meat industry.
Synthetic bristle brushes work best with cream products and also work well with powder formulas. Natural bristle brushes work with powder products.
You want to try to find the softest bristles possible, to reduce tugging on your skin with each use. I find this to be extra important with eye shadow brushes!
3 | Density
A brush’s “density” refers to how many bristles the brush has and how tightly packed they are at the base, the start of the ferrule. The more densely a brushes bristles are packed, the more product it will deposit.
4 | Length
The length of the bristles also determines how much pigmented is deposited. Longer bristles will deposit more sheer pigment and shorter bristles will put down more concentrated pigment.
This is why bronzer brushes typically have long, fluffy bristles and an eyeshadow smudge brush will have extremely short, tightly packed bristles.
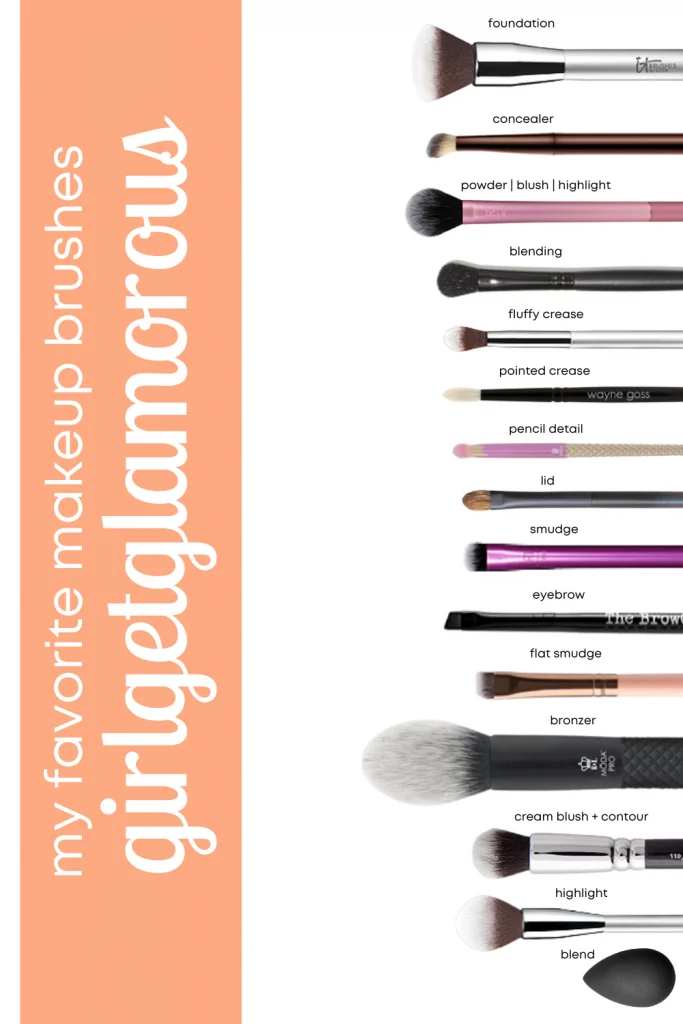
And now, here are all my favorite brushes and info on how I use each one.
I should mention, you by no means have to use this many brushes. I just want to make sure you have recommendations in each category that I have personally tested and love.
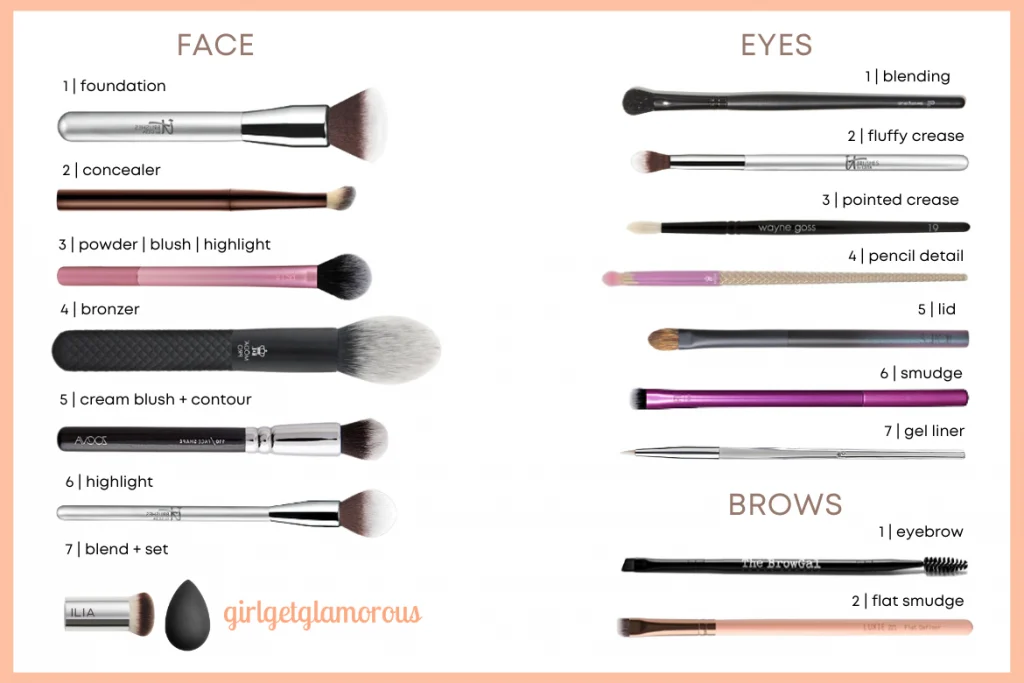
favorite | IT Cosmetics Foundation Brush #101 $24 . BK Beauty #101 Contoured Foundation $34
what it’s for | applying + blending foundation
Using a foundation brush has made my base routine so much faster!
how to use | I dab dots of foundation all over my face with this brush and then blend in small circles. Make sure to wash your foundation brush at least once a week!

favorites | hourglass $38 . rare beauty $16 . beautypie $30
what it’s for | buff + smooth concealer
how to use | I tend to blend my concealer with my fingers, to maintain as much coverage as possible.
Then, I use a very dense concealer brush in in a tapping motion over the concealer to blend the edges and concealer seamlessly into the rest of my makeup.
my favorites | Real Techniques: amazon . ulta beauty $8 . Laura Mercier puff $16
what it’s for | setting liquid + cream products
I love this small brush, it’s by far one of the most useful brushes I own! I have multiple of these and use them to apply powder under my eyes, in my T-zone and anywhere else on my face I want to take down shine. The smaller size is just perfect to set every nook-and-cranny on my face.
I also love this brush for applying powder blush and powder highlight. It’s truly a must-have brush!
how to use | For soft focus looks, tap the top of the brush into your product and dab lightly under eyes, cheeks, and in the t-zone.
For airbrushed skin, gently tap the velour puff into your setting powder, then roll the side without the handle over your skin.
my favorites | Moda #130 $9 . IT Cosmetics Dome Brush #108 $27 . BK Beauty #103 Bronzer Brush $34
what it’s for | applying bronzer + loose powders
The rounded edge help for easy blending, so that I don’t have any harsh lines.
how to use | I tap this brush twice into my bronzer, then place it where the sun would hit on my forehead, top of cheekbone, chin, and neck and pull every stroke back towards my hairline.
my favorites | Zoeva 110 amazon + beautybay $20 . Real Techniques: amazon . ulta beauty $8
what it’s for | applying + blending cream or liquid cheek products
These rounded edge brushes are perfect for applying and blending cream blush and contour.
how to use | I will pick up only one tap of product, then use a stipple technique to apply. To stipple, you press-and-lift, press-and-lift, and repeat until the product is applied and blended.
I generally use my Fenty stick to contour, so I will grab the Zoeva 100 brush to blend that out with the same stippling motion, always going back and up towards my hair line.
favorites | IT Cosmetics #140 $22 . real techniques setting $8
what it’s for | applying + blending powder highlighters
On days I wear powder highlighter, these small brushes are perfect for applying and blending with precision.
how to use | I will pick up highlighter on one side of the brush and sweep on the high points of my cheekbones, going back towards my hairline. Then, I flip the brush over and blend using the clean side of the brush that has no product on the bristles.
my favorites | Wayne Goss Airbrush (my all-time fav for blush + contour) $45 . Laura Mercier Cheek Color Brush $46 . real techniques $8 (blush only)
what it’s for | applying + blending powder cheek products
There are so many shapes and styles to blush brushes! Two of my favorites are a paddle shaped brush that looks a miniature tennis racket. The flat side applies blush precisely and the pointed tip is amazing for soft focus contour.
The more rounded Real Techniques brush is great for applying blush. You can see why I own multiple of these!
how to use | For more concentrated color, with the dome shaped brush, I pick up blush on one side and pat it into my cheeks, then flip the brush over and use the clean side to blend.
For more sheer color, I’ll grab the small round brush (or when I am I a rush, the tip of my bronzer brush) and use a swirling, circle motion, moving back towards my hairline.
my favorites | BK Beauty #105 Large Buffer $38 . BeautyBlender Pro $20
what it’s for | final step in blending base + color products for airbrushed look
This step I have found to be so crucial in getting really well blended makeup! These brushes are twice the size of foundation brushes and very densely packed. The beautyblender is a sponge with a unique texture, that doesn’t absorb products, but gives an airbrushed finish.
how to use | For days I want fuller coverage makeup, I will take a my large blending brush and use a light circle motion over my foundation (after it’s already been applied) to buff out any lines.
I will also go over the edges of blush, highlighter, etc with this same motion and make sure that it all seamlessly transitions in to the rest my face.
The key with these very dense brushes is to use incredibly light pressure, so that everything gets blended, but it doesn’t disrupt makeup or tug on skin.
For days I want more sheer coverage, I will take a damp beauty blender (that I let sit for about 20 minutes) and bounce that over my foundation and at the edges of other makeup. The bouncing motion is a light tap-tap all over my skin.
my favorites | elf blending eye brush $4 . BK Beauty #206 Blending Shader $18 . BK Beauty #203 Shader $18
what it’s for | lid prep or “one-and-done” eyeshadows
how to use | I like using these fluffy brush to prep my eye lid with a light dusting of powder after eyeshadow primer, so that my eyeshadow glides on easily and smoothly.
The fluffy shape is also nice for applying “one-and-done” eyeshadows and/or cream shadows.
For one-and-done looks, start by tapping the brush into your eyeshadow, then apply at your lash line, tapping up over your lid, up to your crease. The color will start out deeper at your lash line and get softer as it gets closer to the crease with this technique.
Use a clean brush to blend the edges out and up, just slightly past your crease.
I prefer the elf for lid prep, the BK #206 for powder eyeshadow, and the BK #203 for my cream eyeshadows. The #203 is a gem!
my favorites | IT Cosmetics Crease Brush #105 $15 . BK Beauty Blended Crease #201 $18
what it’s for | applying + blending eyeshadow transition shade at crease of eyelid
I like to use a fluffy brush here so that the color is very diffused and light.
how to use | I apply shadow just above my natural crease and blend in a windshield wiper motion to softly blend the color. This makes my eyes look wider and is an essential step for me, having partially hooded eyes.
my favorites | wayne goss $23 . Colourpop e19 (from the Ultimate Brush Set) $44 . Sigma e45 $16
what it’s for | creating depth at the eye crease
I use the tapered edge of this brush to place a slightly deeper and warmed reddish brown eyeshadow color from the center of my eye crease in towards my nose. This gives the illusion of bigger eyes and more lid space.
how to use | I use light strokes in small dash motions at my exact eye crease.
my favorite | Sigma E30 $15
what it’s for | under eye + creating outer corner eye shape
The narrowed tip of these brushes helps get shadow as close to the lash line as possible. It also helps me create the perfect lifted shape on the outer part of my upper lid. I can’t do my makeup without one of these brushes!
how to use | I love using a pencil brush to apply and blend my transition eyeshadow shade under my eye.
I also will place a bit of the same shadow on my upper lid at the outer corner and pull it in towards my lid, using this same brush.
my favorites | Surratt medium classic lid ($50) . Colourpop e18 (part of set) $16
what it’s for | packing shadow on eye lid
The Surratt brush is a splurge item, but is completely worth the price. It’s one of my all-time favorite brushes and so incredibly soft on the skin of my eyes.
The Colourpop is a great cost effective find and the bristles are synthetic, so they can be used with creams or powders.
how to use | With a tapping motion, I place eyeshadow down across my eye lid using this brush with a curved top. The curved top makes it easy to get definition between the eye lid and crease.
I start from the base of my lashes and work up towards the crease.
my favorites | bdellium 755 $8 . bdellium 760 tight line $8
what it’s for | setting + smudging eye liner
This brush has extremely short and dense bristles to pick up a very concentrated amount of eyeshadow. This is great for setting liner, smudging to soften eyeliner, or when you want to use eyeshadow as your liner.
how to use | I tab the top of my smudge brush into the shadow, then press it as close as I can to my lash line. The goal is to get the shadow in between my lashes, to create the look of more dense and full eye lashes. I lift and repeat this motion, instead of trying to do one larger line, which would make the brush skip and the line uneven.
At the outer corner of my lid, I place the brush up and out (instead of smudging into my lash line), to create a lifted look to my eyes.
my favorites | BK Beauty #208 $15 . Sigma E65 $15 . bdellium #760 $8
what it’s for | applying eye liner
how to use | These narrow brushes are used for applying gel eye liner or the perfect winged liner.
I pick up a small amount on this brush, wipe it back across the lid of the gel pot, and then use the same small dash strokes to create one larger, smooth line.
This is also the perfect size for applying inner corner highlight. I grab a small amount on the tip of the brush and apply and blend in a “V” shape at the inner corner of my eye. This size is ideal for creating a natural amount of shimmer, without the product being overloaded on to the skin.
my favorites | brow gal $14 . bdellium 762 $8
what it’s for | creating thin lines that look like brow hairs
They can be used with either dip brow or powder formulas. Once you try a super thin brush vs the thicker styles, it’s a total game changer! I’m finally able to create lines that look as thin as my natural eyebrow hairs.
how to use | Grab a very small amount of product on the tip of the brush, wiping any excess onto the lid on your product. Draw a small line, with a gentle curve, to look like a brow hair.
my favorite | bdellium flat definer 714 $8
what it’s for | cleaning up under the brow line
This is a small makeup step that has made a huge difference for me. It cleans up the shape of my brows and makes them look lighter vs adding darker brow product to clean up the edges.
how to use | I take this flat edge brush and a brow highlighter or concealer and draw a very thin line under and over my brows. I use the edge if this brush for the thinnest thin possible, and start at the front of my brows, going out towards the tail.
READ MORE
SOCIAL LINKS
Thank you for reading and being a part of the blog! – Molly


LEAVE A COMMENT