

 You might also like
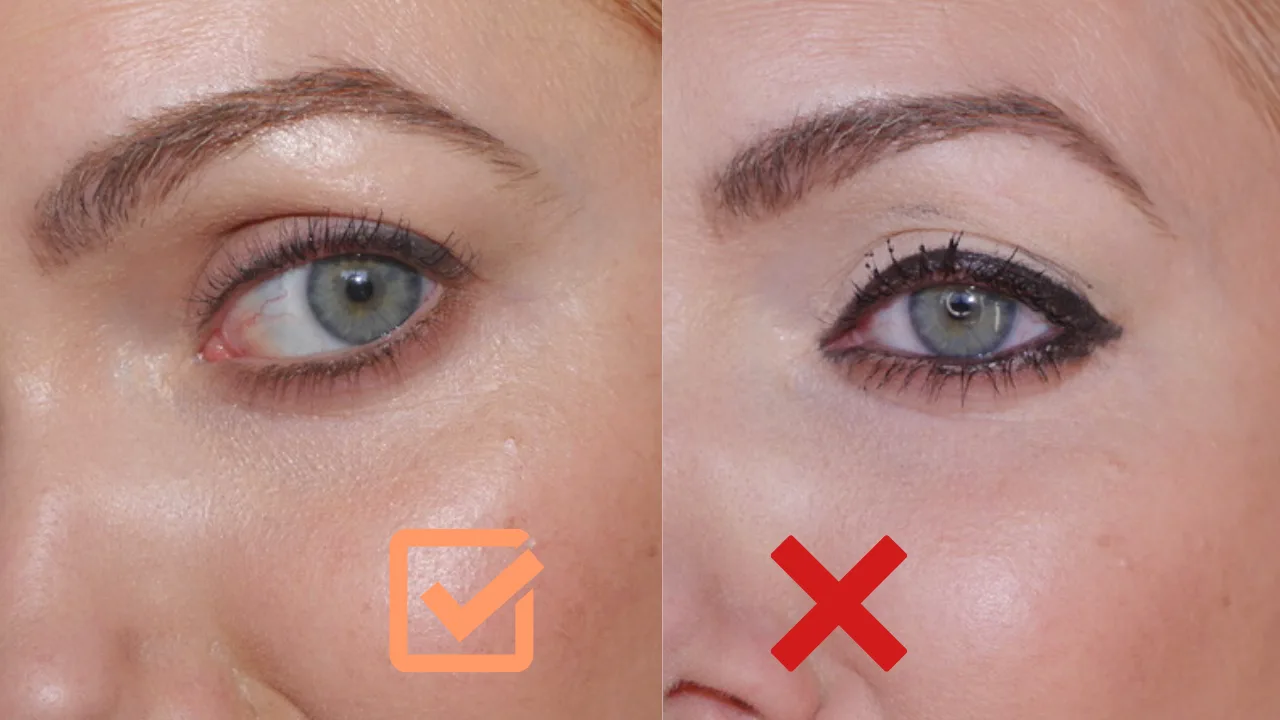 Makeup
Makeup
Makeup 


Welcome to the GirlGetGlamorous blog!
Subscribe for monthly emails of the latest
blog posts and videos, sent right to your inbox.
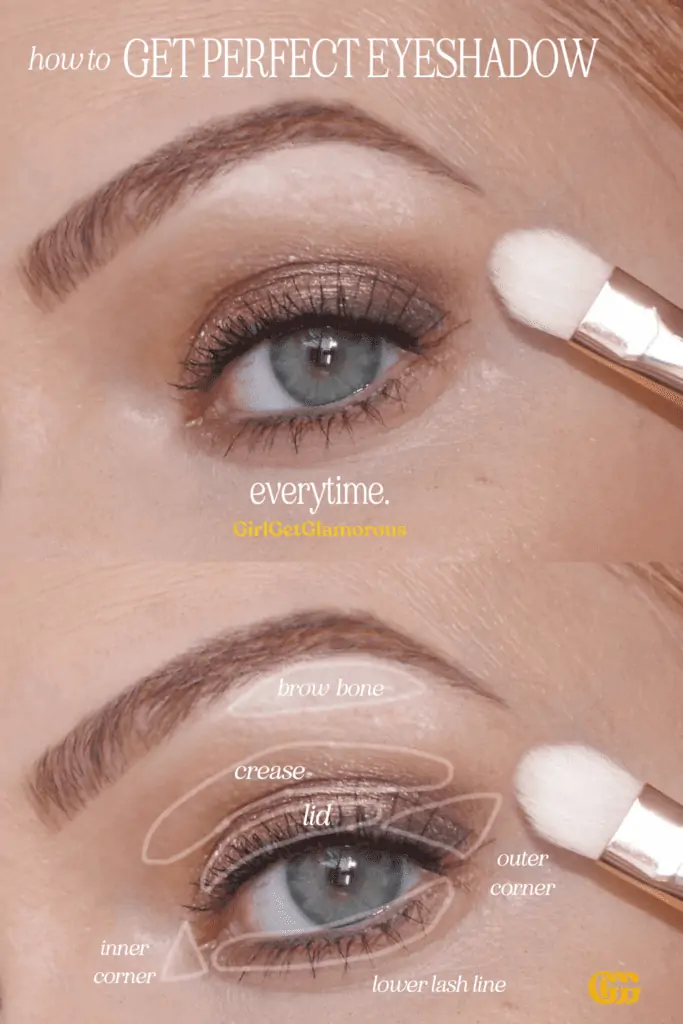
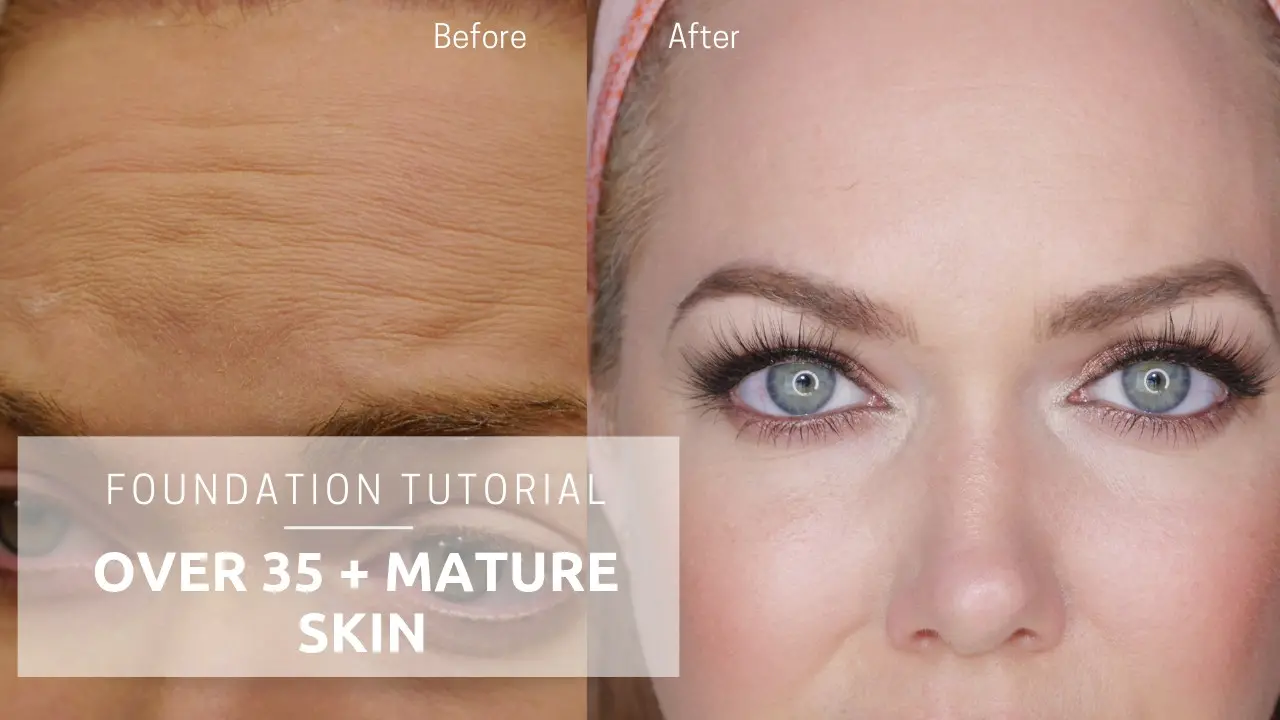
This is my step-by-step guide for getting perfect eyeshadow every time. If you’ve ever had your makeup professional done for photos or for a wedding, you might have been wondering how the makeup artist did your eyeshadow so perfectly.
When I was a makeup artist, the #1 thing I heard from clients was that eyeshadow felt like the most confusing part of doing their own makeup, it never seemed to come out “right.” I want this tutorial to demystify this area of makeup and give you the tools to recreate a professional makeup exactly as the professionals do eyeshadow.
Initially, I know it might seem like a lot of steps, but most are tiny little tweaks that end up making a big difference. At the end of the video, I do one side of my eyeshadow in real time, so that you can see how fast it actually goes.
There are such a variety of eye shapes and this technique is surprisingly universal, but feel free to use it as a loose guide and tweak as needed for your eye shape. The video goes in to detail on tips for hooded and downturned eyes.
My motto for eyeshadow is: “least (amount) applied, soonest blended.”
TIP | I like to build up in light layers, instead of getting a lot of shadow on each brush at once.

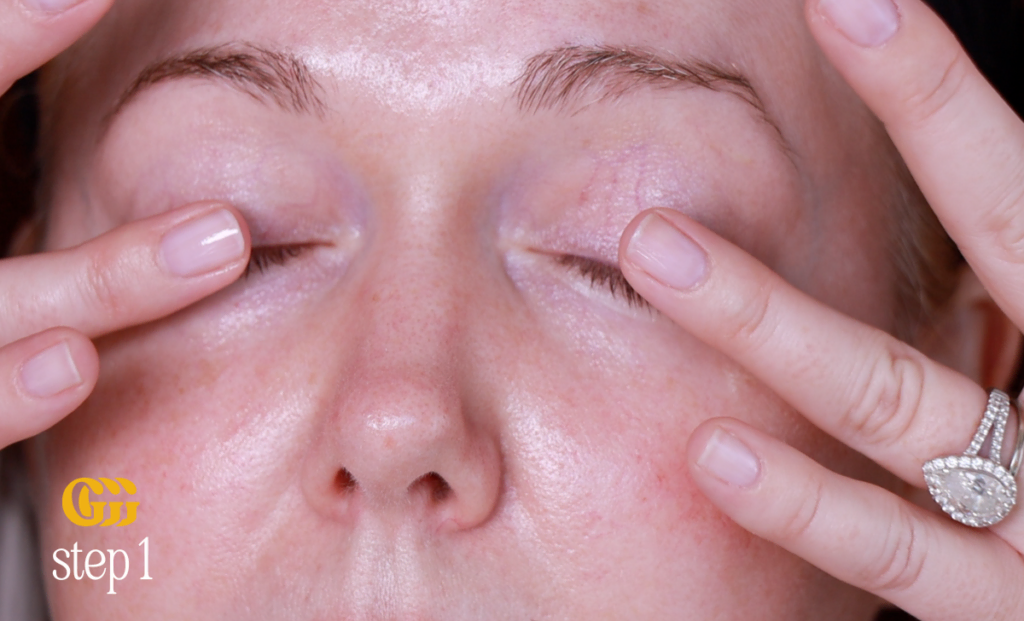
So many times people tell me they have heard they don’t need a separate eye cream and to just use their same face moisturizer. I promise you, once you find the right eye cream, it’s a game changer.
The right eye cream helps eyeshadow look smooth and never dusty.
TECHNIQUE: I apply the majority of my eye cream (a pea size amount for each eye) under my eyes first, then, I dab whatever is left on my ring fingers over my lids. This application method helps me get some hydration on my lids, without overwhelming the base for my eyeshadow.
shop eye cream | DHC coQ10 at dermstore . amazon
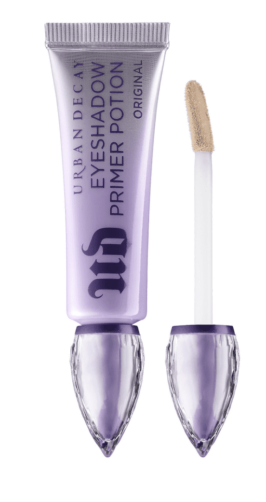
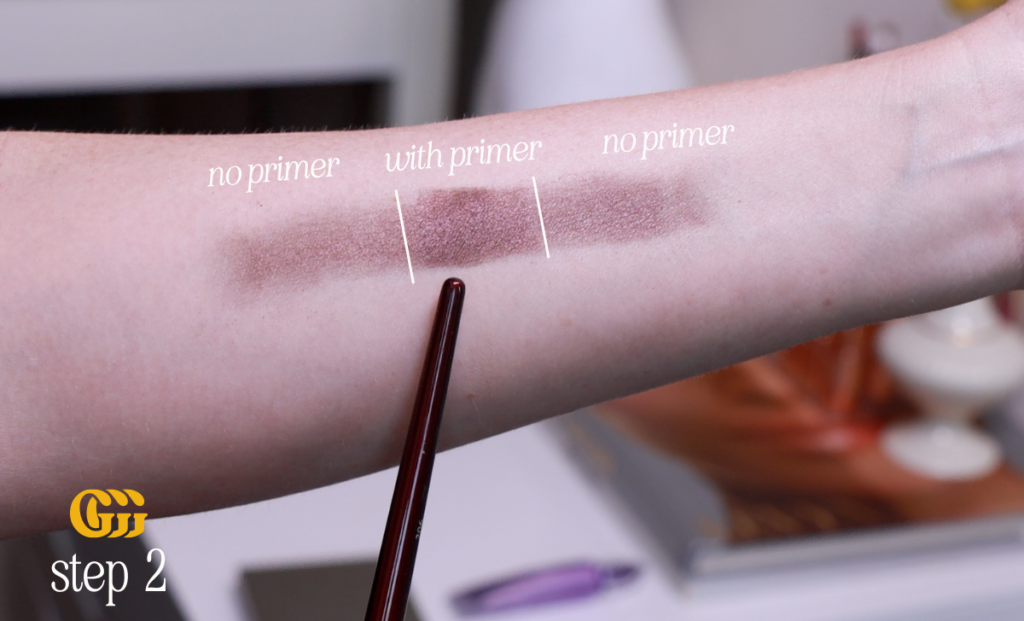
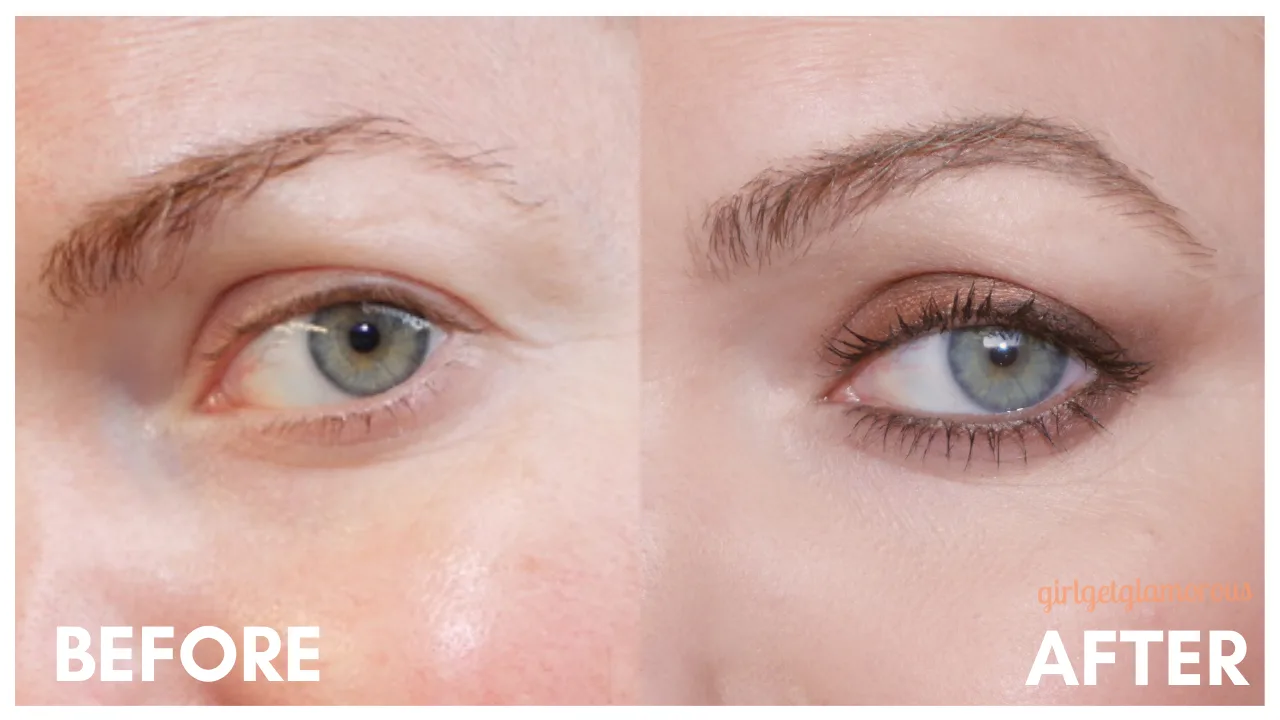
Much like eye cream, primer can seem unnecessary, but the right one will help eyeshadows apply more vibrantly. You’ll actually end up using less eyeshadow, because you won’t have to keep adding layers for it to show up.
After I apply eye primer, I lightly dust either translucent powder over my entire lid. This will help eyeshadows apply smoothly, without the color skipping across the skin.
In the photo, you can see how the section with primer has way more pigment, and the sections that don’t are lighter and will take more eyeshadow to build up to the same level of color.
shop | powder brush . elf blending brush . translucent powder . eye primer
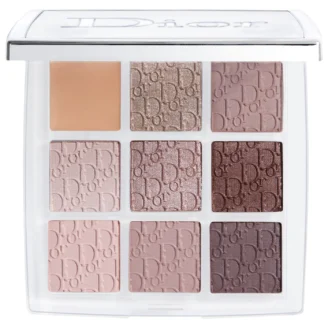
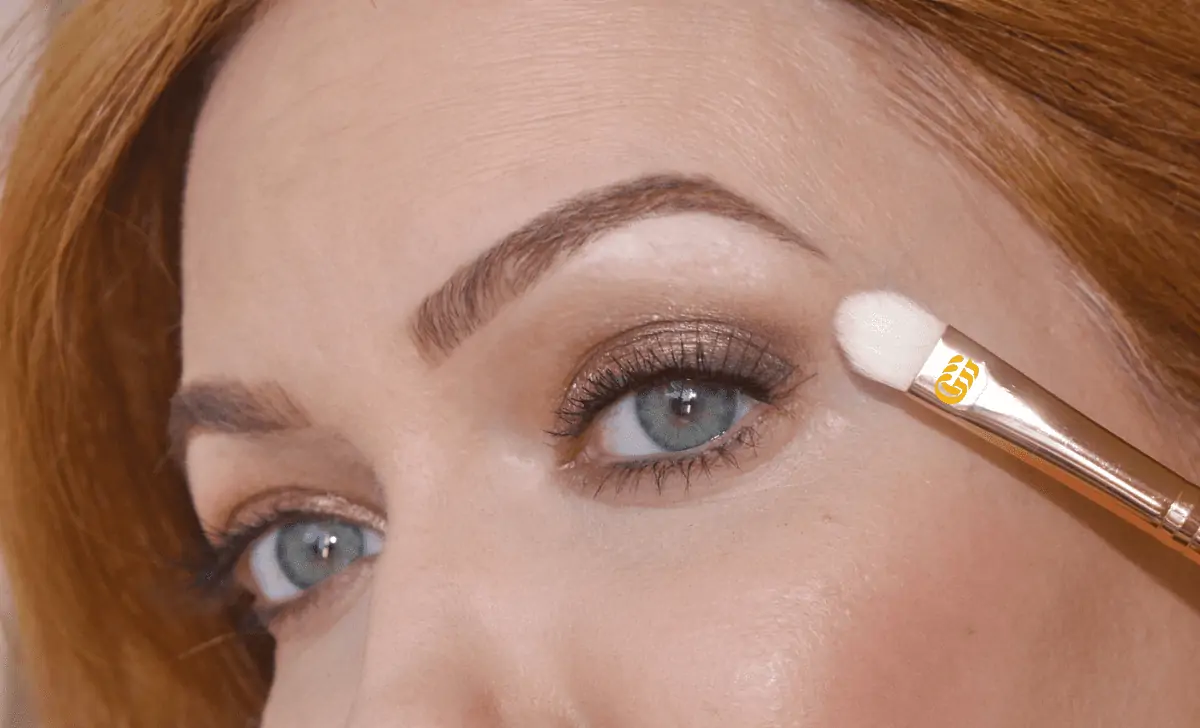
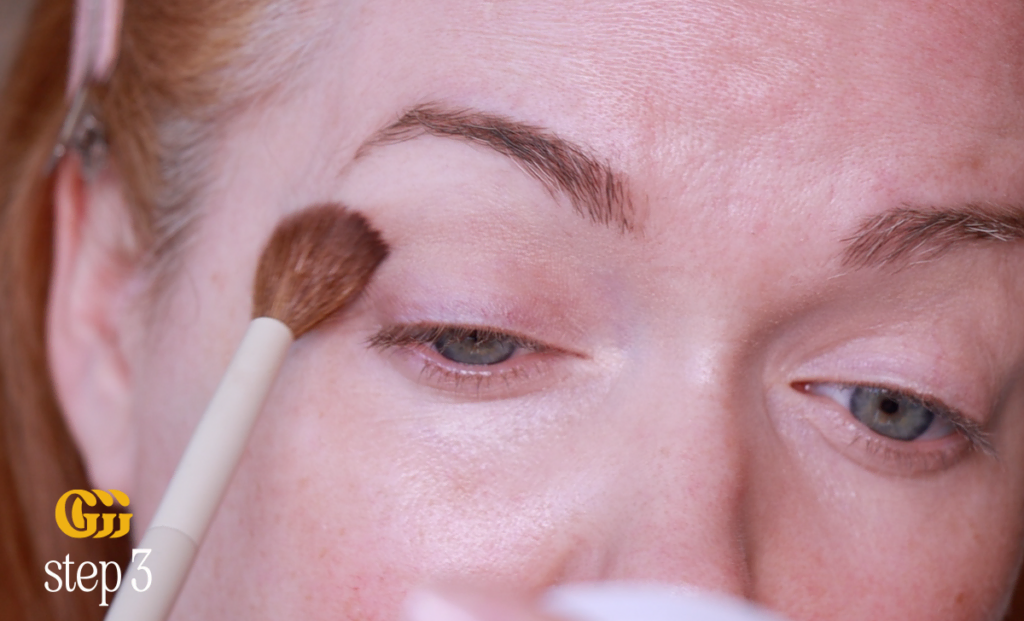
This step uses: fluffy crease brush, pencil brush, + transition eyeshadow shade
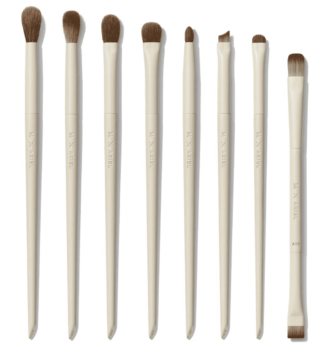
If you are looking for a great set of eyeshadow brushes (instead of purchasing individuals), I highly recommend this set, 8 of some of the softest eye brushes I have ever used.
This step is called the transition shade because it’s the makeup color that transitions your eye makeup into the rest of your skin.
I prefer a more natural look, so I use a shade that is only one shade deeper than my skin tone. For me, MAC “Wedge” is the perfect transition shade.
I have a smaller lid shape and my eyes are downturned and slightly hooded at the outside corner.
Based on my eye shape, I take my crease shade just above my actual crease and apply it up and out at the outer corner, above the actual crease. I never bring my crease shade past the edge of my eyebrow.
I prefer to apply with a windshield wiper (back-and-forth) motion and then when all the shadow is applied, I take the same brush and start to do swirling motions to really diffuse the shadow for a perfect blend.
TIP | To create the perfect eyeshadow shape on your upper lid, hold a pencil brush under the bottom lashes at the outside edge of your eye, directing the brush up towards the tail end of your eye brow.
shop MAC Wedge | MAC . MAC at nordstrom . BK Beauty 201 fluffy crease brush . Morphe x Ariel eye set . Sigma e30 pencil brush
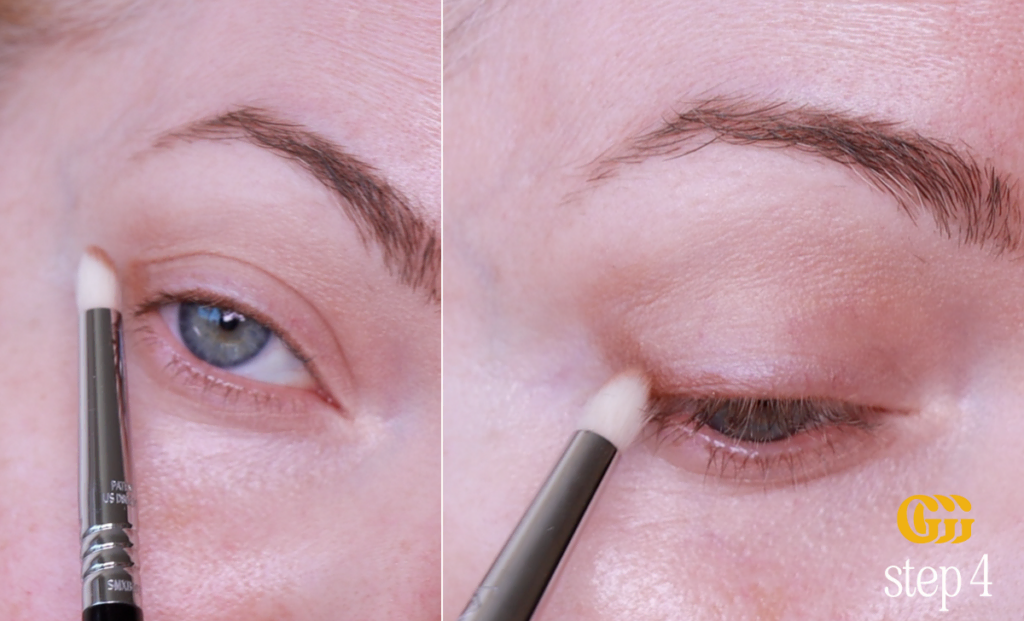
This step uses: pencil brush + transition eyeshadow shade
Using the same pencil brush and transition shade, hold the brush at your lower lash line, going toward the end of your eyebrow.
Now “mark” this shape by placing your eyeshadow down. This will help create the perfect lifted “V” shape with the transition shade at the crease.

Using that same pencil brush, grab a bit more of the transition shade eye shadow. Place it at the tip of the “V” shape we just created and draw the brush in, towards your lid and down, towards your lash line.
This helps create the perfect eyeshadow base shape and frames your eye for the lid shade.
If you need to deepen the outer corner even more, repeat this step with a deeper shade. I find it easier to start with lighter shades and then build up to the intensity I want by adding darker shades as needed.
shop Angled brush | BK Beauty #205 Contoured Shader Brush
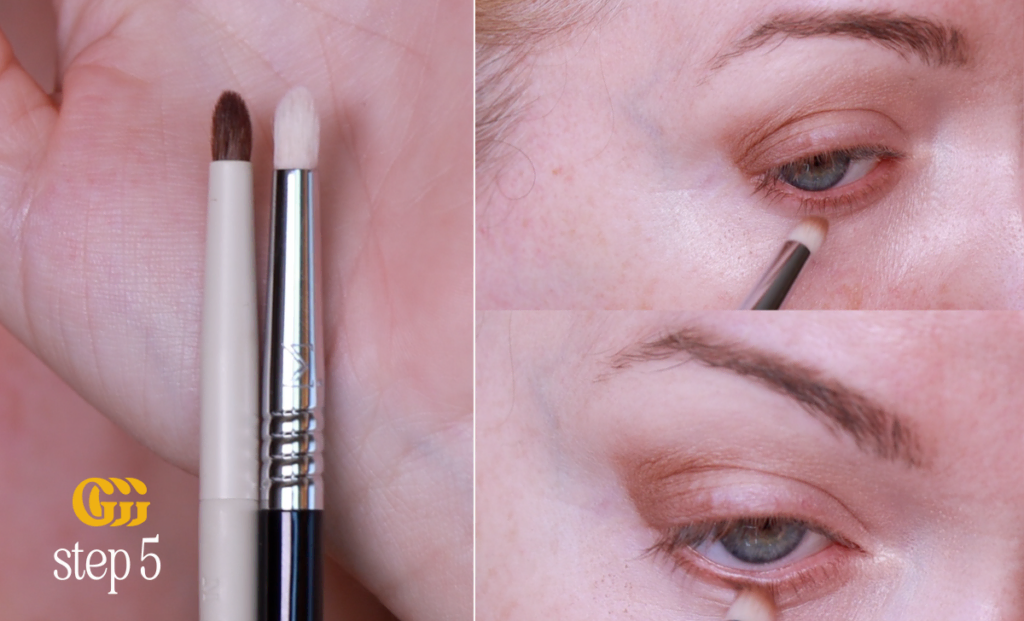
This step uses: pencil brush + transition eyeshadow shade
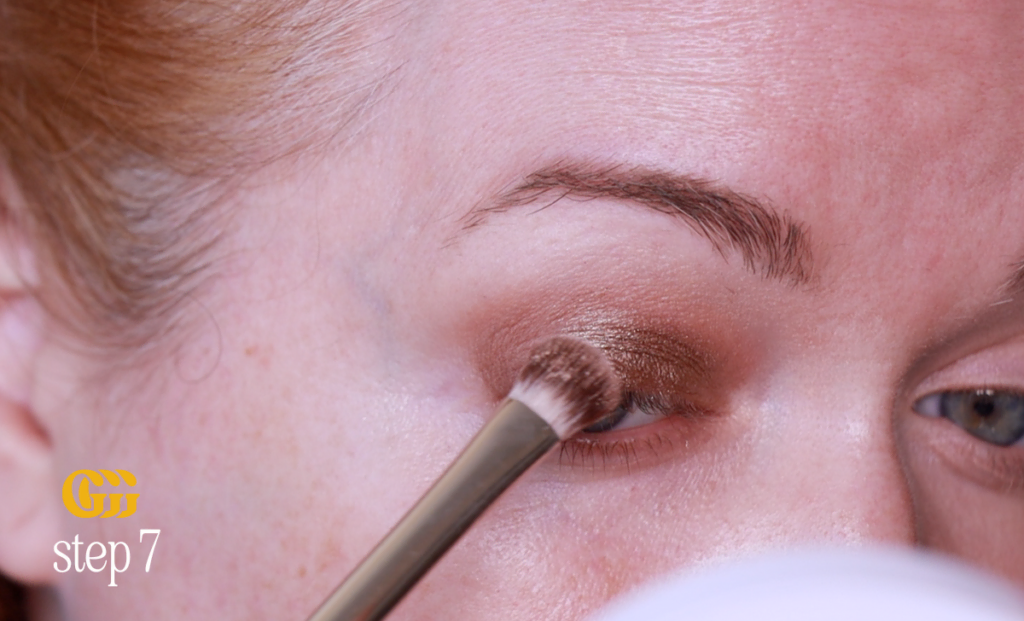
This step is really personal based on your eye shape and desired makeup look. I love the look of a bit of eyeshadow at the lower lash line on myself.
Bringing the same shadow shade from your crease under your eye can give you a soft smoldering look and/or bigger looking eyes. However, on some eye shapes, this can drag down the shape of your eye, so just experiment to see if it enhances the eyeshadow look for you.
I switch to a pencil brush and use the same eyeshadow shade we just used in the crease. I bring it as close to my lash line as possible, starting in the middle of the lower lashes, applying in short dash strokes (instead of one long line, which can tug and skip).
shop Pencil Brush | sigma E30 pencil brush . amazon
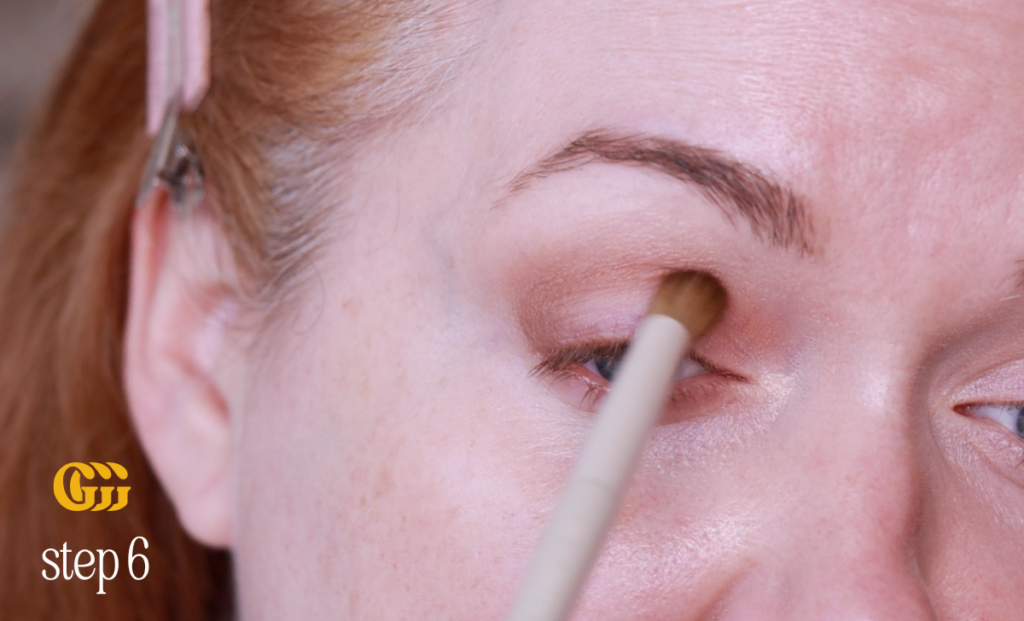
This step uses: precision crease brush + eyeshadow shade deeper than transition shade
Using a slightly warmer and deeper eyeshadow shade than we just used (for me, MAC “Saddle”) and a more narrow crease brush, I add a shadow into my crease, lower than the first transition shade, from the center of my lid in towards my nose.
Deeper shades help recede areas. By placing a deeper shade in the crease, it brings the crease farther back and can make your lid space look larger and more defined.
I use a more narrow crease brush here so that the eye shadow is diffused, but also stays in the area I am placing it.
shop MAC Saddle | MAC (free shipping) . MAC nordstrom . sigmaE45 brush . nordstrom
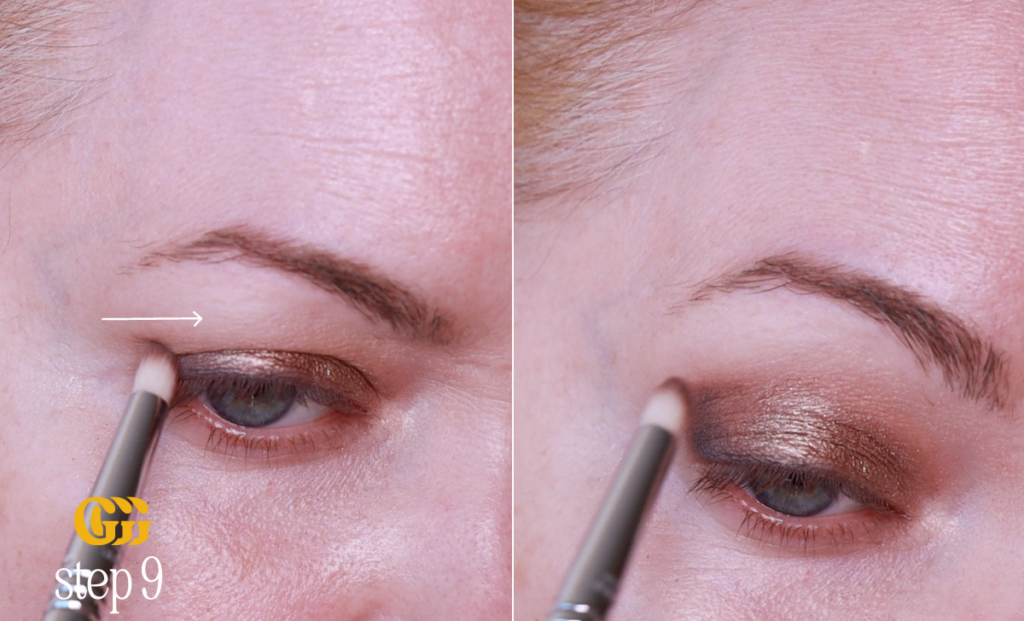
This step uses: lid brush + any eyeshadow shade
Now that the basic shape of our eyeshadow look is laid down, it really gets fun! You can use any shade you want over the lid.
Lighter shades across the lid will brighten and make your lid look larger, mid tone shades will create a smoldering look. I tend to go for a bronze shimmer, but a light matte peach is also nice when I want a “clean” look.
Starting at the center of my eye, at the base of my lashes, I press shadow into my lid and up to the crease. I blend it out to the outer part of my iris, then in towards the inner corner of my eye.
shop Lid Brushes | surratt lid brush (incredible quality) . BK Beauty #203 (cream + liquid shadows) . morphe M210
shop My Favorite Lid Eyeshadows | MAC official Orb refill pan . MAC Orb (light peach) . CT Oyster Pearl w/free ship (my go-to!) . Colourpop Wattles
This step uses: eye liner, smudge brush, + deeper eyeshadow shade
I love this step because it really thickens the look of my lashes!
TIP | It’s really important to sharpen your pencil before every use, this will help you get a more precise line and get in closest to your lashes.
I apply liner as close as I can to my lash line, then set it with an eyeliner in the same shade. As a former makeup artist, I cam honestly say this technique looks good on everyone.
The aim of eye liner is to get it as close to the lash line as possible, to fill in any gaps and make the lashes look fuller. I use short dash strokes, instead of trying to apply in one long line.
Because I have downturned eyes, I will flick my liner up at the outer edge of my eye, starting the upward flick where my eye begins to go downward. On the lower lash line, I only place liner on the center of my lower lash line, to give definition, without making the lower lash line look “heavy.”
To wedge the liner even more in between my lashes, I will take a narrow smudge brush and a deeper taupe eyeshadow and press shadow over that liner. This softens the look of liner and also sets the liner for all-day wear.
shop Liner Products | Ilia official (shade Just) . Ilia at sephora . smudge brush . smudge brush from set
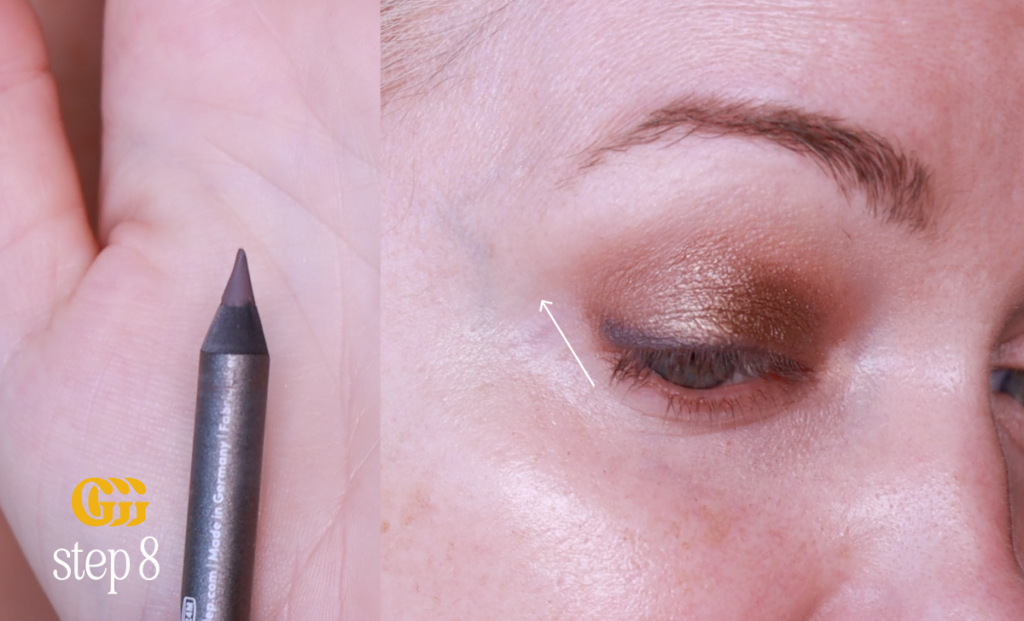
This step is for anyone who has hooded or partially hooded eyes.
TIP: If you have hooded or downturned eyes like me, I like to go over where my eye creases at the outside edge and “erase” that crease. This helps me create an upturned almond eye shape.
Looking forward, with my eye still creased, I’ll tap some darker taupe shadow over the crease, with the bristles of my brush pointing out and up (towards my eye brow). Then, I’ll tilt back and start to blend it in towards my crease and lid.
It feels really strange the first time you apply shadow this way, but applying it with my eye still creased has been the best way for me to get perfect lifted placement. Start with one light tap of shadow and build the intensity.
Once all the shadow is placed, I blend the edges with an angled brush to really define that “V” shape and blend all the shades together.
shop Angled brush | BK Beauty #205 Contoured Shader Brush
This step uses: glitter eyeshadow shade + ring finger
For an extra “pop” grab an eyeshadow with a glitter finish in the same shade or lighter than your lid shade.
Using your ring or pinky finger, tap lightly once on the glitter shadow, then place a small amount on the center of your lid. If you are looking forward in the mirror, this would be directly over your pupil.
Sometimes I add the slightest amount under my eyes, also in the center only, right under my pupil.
This glitter can make your eyes sparkle. Applied sparingly, most of the time the glitter is not even visible until you are up very close. The key is to use the smallest amount of glitter.
shop Colourpop Amaze Glitter shade | colourpop . ulta beauty
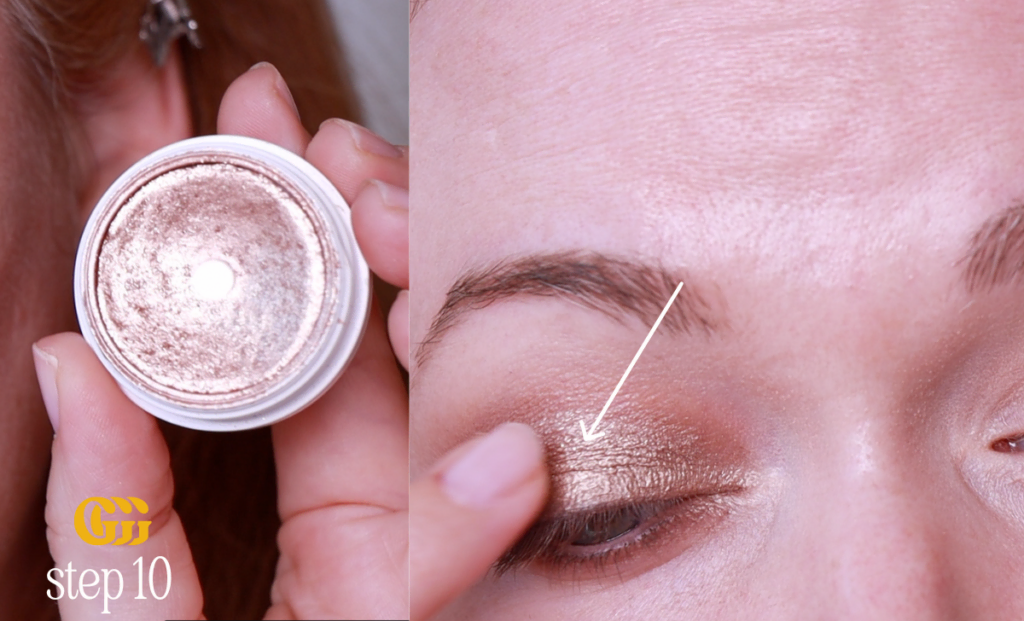
This step uses a champagne satin finish eyeshadow and narrow brush.
The just the very inner most corner of your eye, pop a tiny amount of champagne colored eyeshadow, with a satin finish. Blend thoroughly.
This little extra step can really brighten your eyes and the overall look of your makeup!
shop | stila kitten . pointed brush (part of set) . ulta beauty
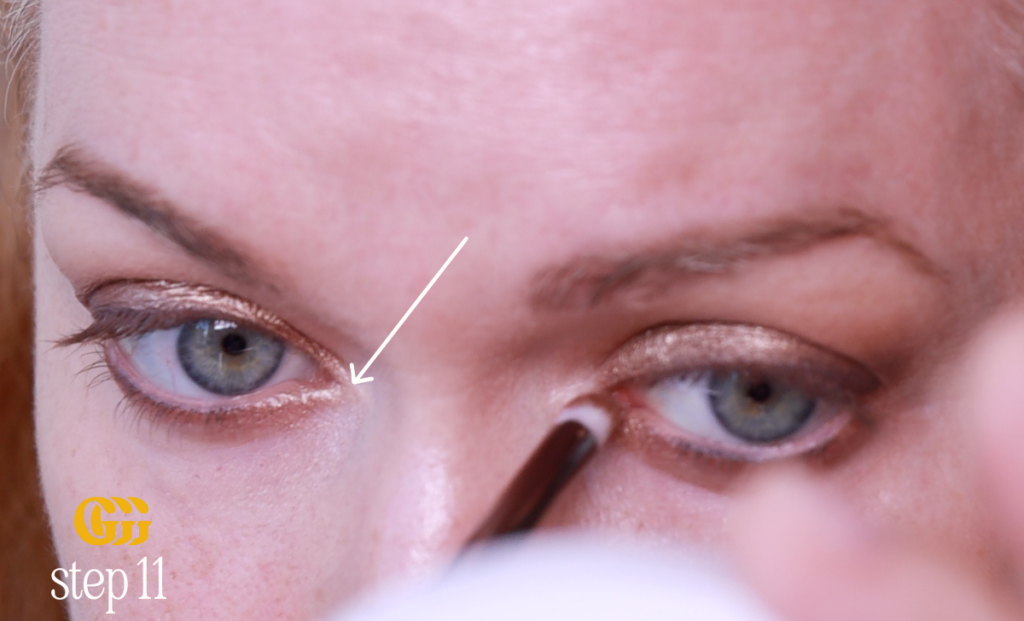
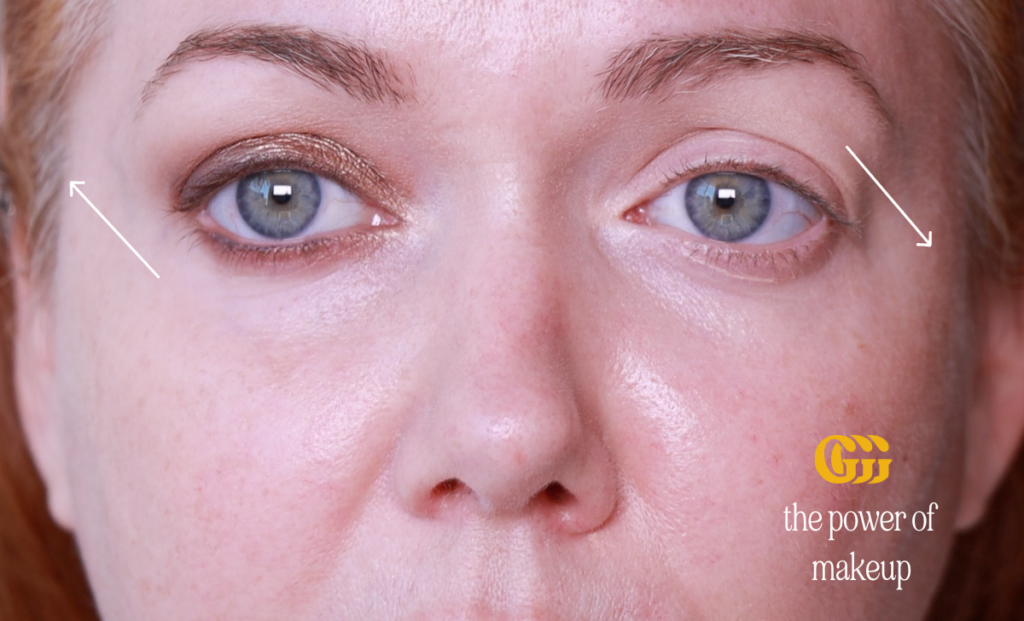
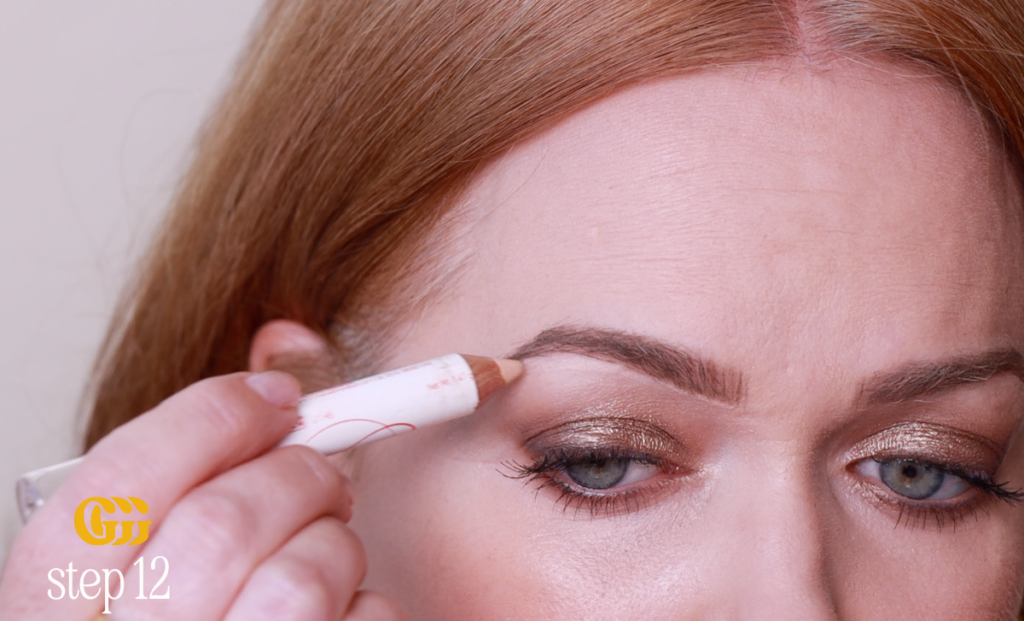
To lift the look of your eyes and brow, draw a thin line with either a cream (my preference) or a powder one shade lighter than your skin tone and then blend. This is one of those small, easy tricks that makes a nice difference.
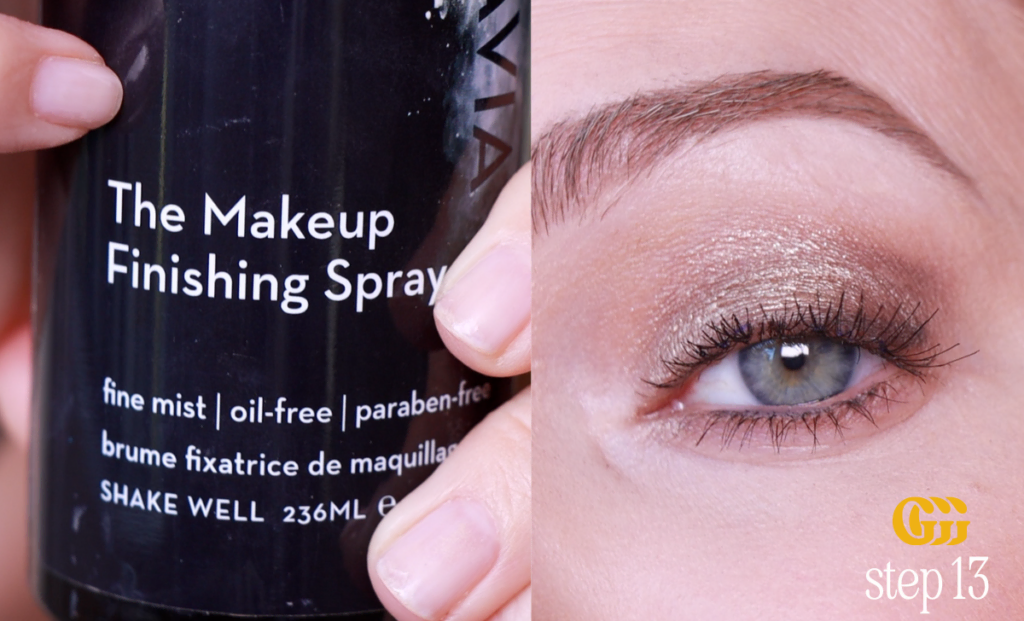
This is my “secret” step for crease-free eye shadow that lasts all day. It also helps prevent mascara from smudging.
After your eyeshadow is finished, but before applying mascara, grab your setting spray and spray over your eyes. Make sure to keep your eyes gently closed while the setting spray dries down, so that the shadow has a smooth finish.
I always notice a huge improvement in my eyeshadow and mascara longevity when I do this step! I’m able to make my eyeshadow last 12+ hours.
shop setting spray | skindinavia . amazon . sephora
Let me know how this tutorial works for you! It amazed me how much faster my eyeshadow application goes now after getting these techniques and placement down. Also, I feel so much happier with my results!


LEAVE A COMMENT
Thanks, Molly! This video was helpful. I will try it out tomorrow morning!