 Makeup
  Makeup
Have you ever felt like you were really close to getting something right, but for some reason there was just one little thing you just couldn’t get right? Like in a dream, when you keep trying to dial a phone number, and you can’t get that last dang number typed in right?
That’s sort of what contouring felt like for me. Like, it’d be so close to how I wanted it to look, but when it really came down to it, it wasn’t totally 100% how I wanted it to be.
I wanted to it to be more blended and not settle into my pores and get a little darker in them. I felt like I had to keep adding powder to get the definition I wanted, but then my little acne scars on my left cheek would get super filled up with the powder and then look like little grey dots on my cheek.
SO…
What happened you ask? Cream, cream happened.
You might remember from {this} post that I was wistfully wishing on owning every cream contour ever.
Well, I don’t own every single one. But I try a couple of them and they are a game changer. Natural looking contour that blends like a dream. Dry/Mature/Pale skin rejoice.
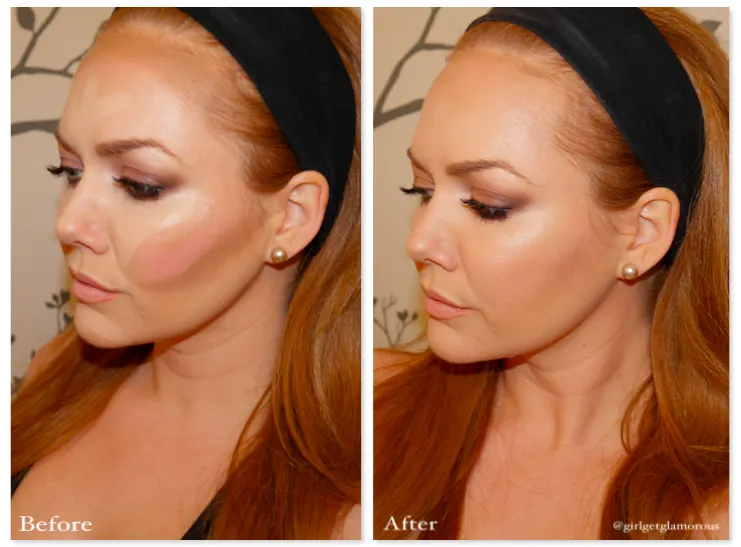
This is now my go-to routine for my face makeup. I do my foundation first, then this contouring, concealing, and highlighting over it. I don’t put them on and them blend all at once, the picture is just for reference on where I’m putting each product, as I know I can get a bit *ahem* wordy.
Cream Contouring:
1. I start by going right under my cheekbones with a line of cream contour. I use my Makeup Geek Angled brush and Becca Cosmetics Lowlight.
2. I blend that as much as I can with the same brush and then blend more with a damp beauty blender if needed.
3. I repeat these steps around the corners and across my forehead, adding a bit of extra contour to my temples, to round out my forehead (my hairline makes it look square), and under my jawline as well.
Concealer:
1. I start at the inner corners of my eyes and bring the concealer down and out towards the edge of my eye.
2. Essentially, you are making triangles under your eyes with the concealer.
3. Dab a bit of concealer down your nose, just slightly above the middle of your eyebrow opening, and on the center of your chin. (Also, you can do a little bit over your upper lip, if you have a super sexy shadow mustache like me!) Think of a diamond shape. The center of your face is the diamond, where all the concealer goes.
4. Optional, sing “Shine Bright Like A Diamond” by Rihanna in your head while you are doing it and then try and get the song out of your head the rest of the day. Good luck.
5. Blend the heck out of this concealer, hello, beautyblender.
6. If I’m using a cream blush, I apply that now and set my concealer with powder after, because creams can’t go over powders.
Cream Highlighting:
Heaven sent for dry or mature skin! This gives your skin a glow, without emphasizing fine lines around the eyes. It’s the key to a great photo op, btw.
1. Dab highlighter, I’m using Becca Shimmering Skin Perfector in Opal, onto the top of your cheekbone. This will be the highest point of your cheekbone (press the skin under your eye with clean hands to find cheekbone).
2. Bring the highlighter around your eye, up the side in the shape of a “C” and stop right before the arch of your eyebrow.
3. Now blend, HUNEY, blend. I blend first gently with my fingers, then use my damp beautyblender to press the highlighter into my skin and foundation. This way it looks natural, like glowing skin and not highlighter.
Setting:
On days where I need/want my makeup to last forever, I will set it ever-so-gently with coordinating powders. For a dewier look, just leave the creams as-is, except for Step 2 below.
1. I go back over my contouring with Anastasia contouring powder in “Fawn.” You don’t have to use the same products as me, just aim for a cooler shadow taupe-grey powder with no shimmer. I do this with either a fan brush, the Tarte contouring brush, or the brush that comes with the Benefit Hoola bronzer. You only need the lightest touch of contouring powder to set the cream.
2. I blend that contour powder, then add a thin stripe of light face powder underneath the contour line. This helps it look more precise, which actually makes it look more natural. I’m using the cream and banana shades from the same Anastasia kit and a fluffy brush from Tarte.
3. Grab your beauty blender again and blend out any creasing from your concealer under your eyes and then immediately set it with a loose powder. I’m using the same Anastasia combo from step 2. This Stilazzi brush was super affordable and has become my go-to for setting concealer.
4. Grab a clean fan brush, lightly tap the brush into your powder illuminator, Becca Pressed Shimmering Skin Perfector here, and lightly go over the same areas you just highlighted with the cream.
5. If you got a little heavy handed, grab the beauty blender and dab over the powders.
Little bonus highlighting that’ll have you saying “Molly, you’re my gal”:
– Grab that same fan brush you just used to set your highlighter and brush it in a back-and-forth motion over the cupid’s bow of your mouth to make your upper lip look fuller. It’s one of those little tricks that you’ll start doing that immediately becomes part of your daily routine. Quick and packs a punch.
Step-By-Step Video:
Products Used
Contour |
Fenty “Amber”, $25for .25 oz.
Highlighter |
Becca Shimmering Skin Perfector, $19 for .68 oz. I love both Moonstone (fair to light) and Opal (light to Medium). Topaz would be beautiful for deeper skin tones.
Benefit High Beam, $26 for .45 oz. A pretty rosy pink nude highlighter that looks good on everyone.
Concealer |
Maybelline Instant Age Rewind Concealer, $8 for .2 oz.
Tools |
Makeup Geek Angled Contour Brush
______
Alright, dolls, you are contoured and highlighted and concealed! Leave me a comment below, I love hearing from everyone! Let me know if you try this and if it’s helpful.
Thank you for reading! If you want to share this post on Facebook, Pinterest, or Twitter, the buttons are all below this post to make it really easy. I love when you all share these posts with your friends and family, thank you! You can follow me on Instagram @girlgetglamorous and hashtag your pics #girlgetglamorous!
Go Get Glam!
 You might also like
LEAVE A COMMENT
Where does the bronzer come in here? Gosh, I’m so confused. Contour. Blush. Highlighter. Concealer. Bronzer. Foundation. Powder. All of THIS on my face?? 🙁
Hi Karin!
Sorry for the delayed response! I use a very small amount of each product. The contour I place on the edges of my forehead, hollows of cheekbones and under my jawline. Bronzer I sweep very lightly over my entire forehead, the apples of my cheeks and the top of my chin, basically anywhere the sun would hit. The key for me is to just got very, very light with each product so it doesn’t feel like I’m wearing a lot. The contour is more to define your bone structure, whereas bronzer warms up your complexion overall. I hope this helps and makes sense! xo – Molly
i like it ….. very good to go
[…] helped thin it out as it is a very full coverage foundation. I highlighted and contoured with my usuals – Becca, Becca and little […]
thanks for this post, you show me how to use bronzer and still have pale, bright skin tone. I love your make up advices